
In this post, we will consider a setup for legacy networks, which is, combined with some API calls to the DNS server, allows for updating the entries automatically and facilitating an automatic failover. This presentation was delivered by Brian van Baekel, an experienced consultant and Zabbix trainer at Opensource ICT Solutions B.V., The Netherlands during Zabbix Conference Benelux 2020.
Contents
I. Two-network monitoring setup (0:25)
II. Monitoring via DNS (2:51)
1. DNS configuration (6:17)
2. Zabbix host configuration (7:00)
3. Why different approaches? (7:36)
III. SNMP traps (9:44)
IV. Q&A (12:03)
Two-network monitoring setup
In a simple network setup with the Zabbix server and a device, where the device is monitored by the Zabbix agent, there is not a single issue.
 Monitoring setup
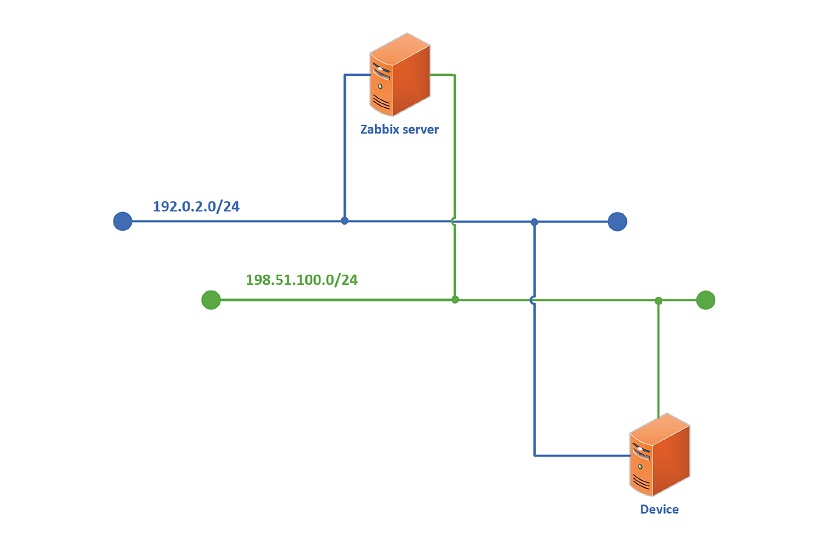
In a simple setup, monitoring is redundant. Here we have:
-
- Zabbix server (fully redundant, with 2 interfaces per LAN (bonded)),
- Device (with a single interface per LAN),
- Network (separated with no connections or routers).
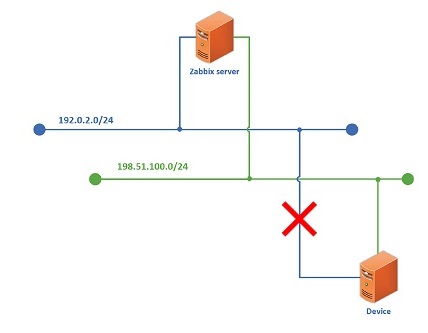
In our example, if we are monitoring the device over the blue network and the green network goes down due to a problem, monitoring will continue without disruptions. But if the blue network goes down, monitoring will be disrupted.
 Monitoring disruption due to a network outage
Here the problem is to tell Zabbix to monitor over the green network.
We can of course create a second host — Device 2 with the green network IP, and start monitoring these two devices over two networks. But the Device IP must be unique, so monitoring two IP addresses will not work.
Monitoring via DNS
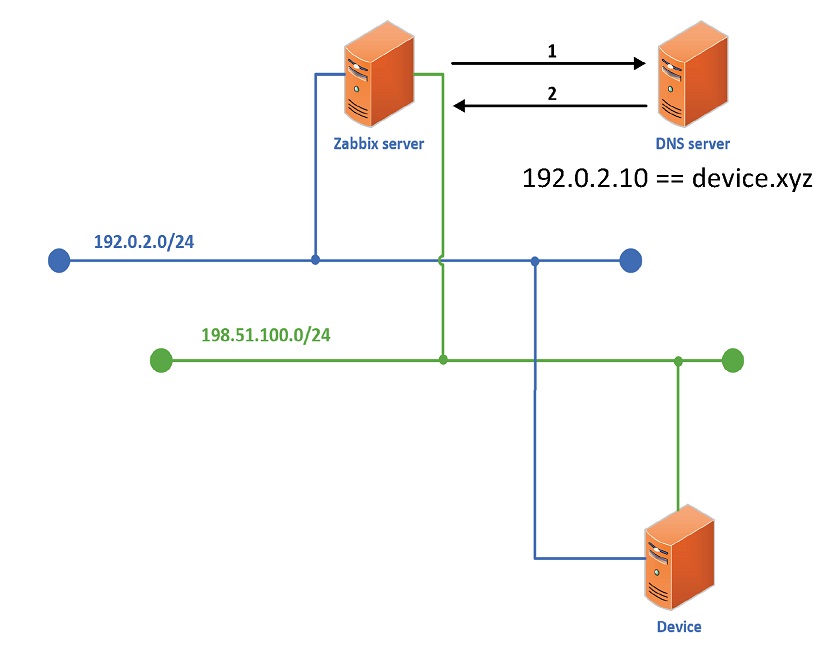
If we start using DNS instead of IP addresses, we can play around with DNS servers and custom scripts and initiate a failover. In this setup, every time the Zabbix server is trying to poll an item, it asks the DNS server what the IP entry is.
 Monitoring via DNS server
So, when monitoring is performed over the blue network, items must be polled:
1: Request ip of device.xyz
2: device.xyz = 192.0.2.10
In this case, if the blue network goes down, the Zabbix server will reach out to the DNS server, get the same IP address over the blue network, and we’ll still have the network outage.
To fix this problem:
-
- You need to create a ‘keepalive’ item on the host with a trigger on it.
- If the trigger goes into the problem state, fire an action: change the DNS record.
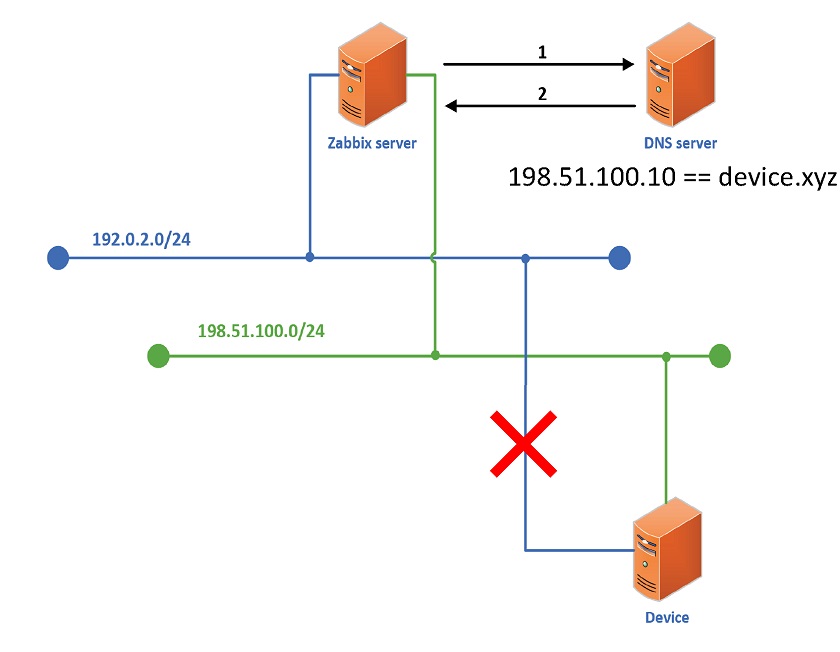
For instance, if you are using dnspython, which has a nicely documented API, you can define the condition: if the trigger ‘device keepalive is in problem state‘ fires, execute remote command: ‘python dnschange.py {blue ip} {green ip}‘, and API will call to DNS server to edit the entry.
 DNS editing the entry
Here item must be polled:
1: Request ip of device.xyz
2: device.xyz = 198.51.100.10
So, even if the blue network is down, the Zabbix server will reach out to the Device over the green network and monitor the Device.
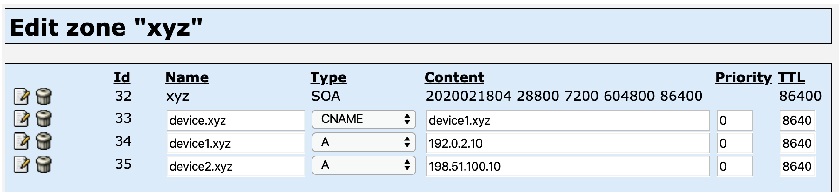
DNS configuration
We can create an A record: device.xyz = IP:
 A record
We can also name a CNAME record: device xyz = device1.xyz:
 CNAME record
Zabbix host configuration
If we use an A record, we have to specify IP addresses in the Zabbix frontend in order to define parameters for the script:
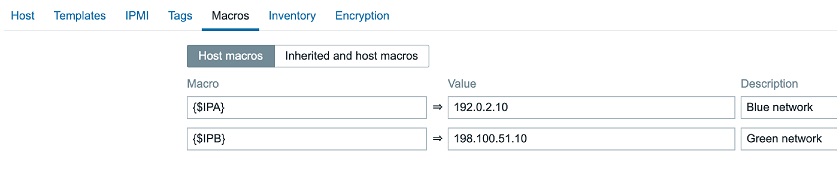
A record: device.xyz = IP
We can also specify a CNAME record instead of IP addresses:
 CNAME record: device.xyz = device1.xyz
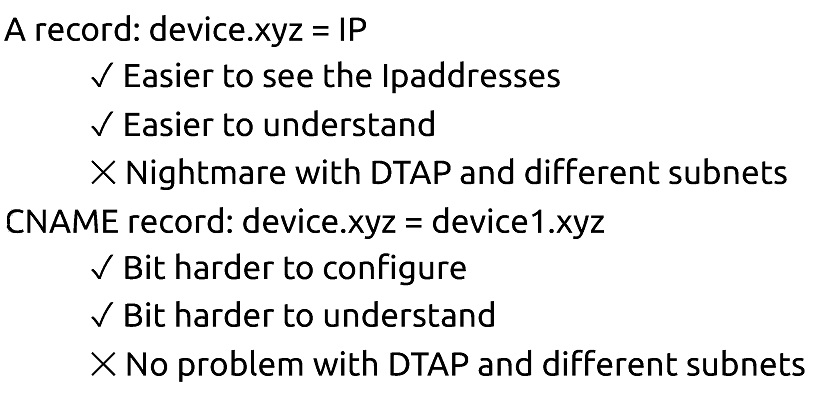
Why different approaches?
With an A record we can specify IP addresses in the Zabbix frontend, so configuration is pretty straightforward. However, if you have multiple environments, you’ll have different IP addresses in every environment in case of migration. So, the more hosts you have to migrate between environments, the more annoying and error-prone this will be.
With a CNAME record, you have to define the DNS record in the Zabbix frontend. So you have to create DNS servers in different environments and specify IP addresses just once. Such a setup allows for cloning or migrating hosts between different environments without changing anything because the DNS server remains completely static.
 A record vs. CNAME record
SNMP traps
If you are using SNMP traps, you’ll see that Zabbix is converting traps’ IPs. Unfortunately, we don’t have any interface pointing to the source IP address. Without this, the trap won’t process the host.
 Converting received traps’ IPs
To fix it, you can adjust the default perl script, or build your own script to extract the IP when the trap is received, capture source IP, translate it into the DNS name, and parse the DNS name back to the Zabbix server.
 Received trap
Q&A
Question: Is there a specific reason for using two networks?
Answer: There’s no particular reason, normally it means working around some legacy setups.
Question: What prevents us from specifying two IPs for the A record?
Answer: Two IP addresses on one A record won’t work because of the DNS configuration.
Question: We can specify two IP addresses in the host definition, and specify the same twice in SNMP. Isn’t this option available?
Answer: The issue here is that the IP should be unique for every host, and you have to specify which interface to use. You can play around by specifying two interfaces, but you’ll duplicate item keys, which won’t be accepted.
Question: For instance, we are monitoring the host with IPv4 and IPv6. So, connection to the DNS server will work fine, and if IPv4 is down, the connection via DNS will still work. But won’t we have the same issue with SNMP traps?
Answer: I’m pretty sure, this example demonstrates the solution to the problem.